Mary Kelly
There’s something so delightful about the experience of biting into a warm apple bar—especially when it’s made from the finest quality ingredients. You know, those moments spent during autumn when the air is crisp, and the scent of cinnamon and baked apples wafts through the kitchen?
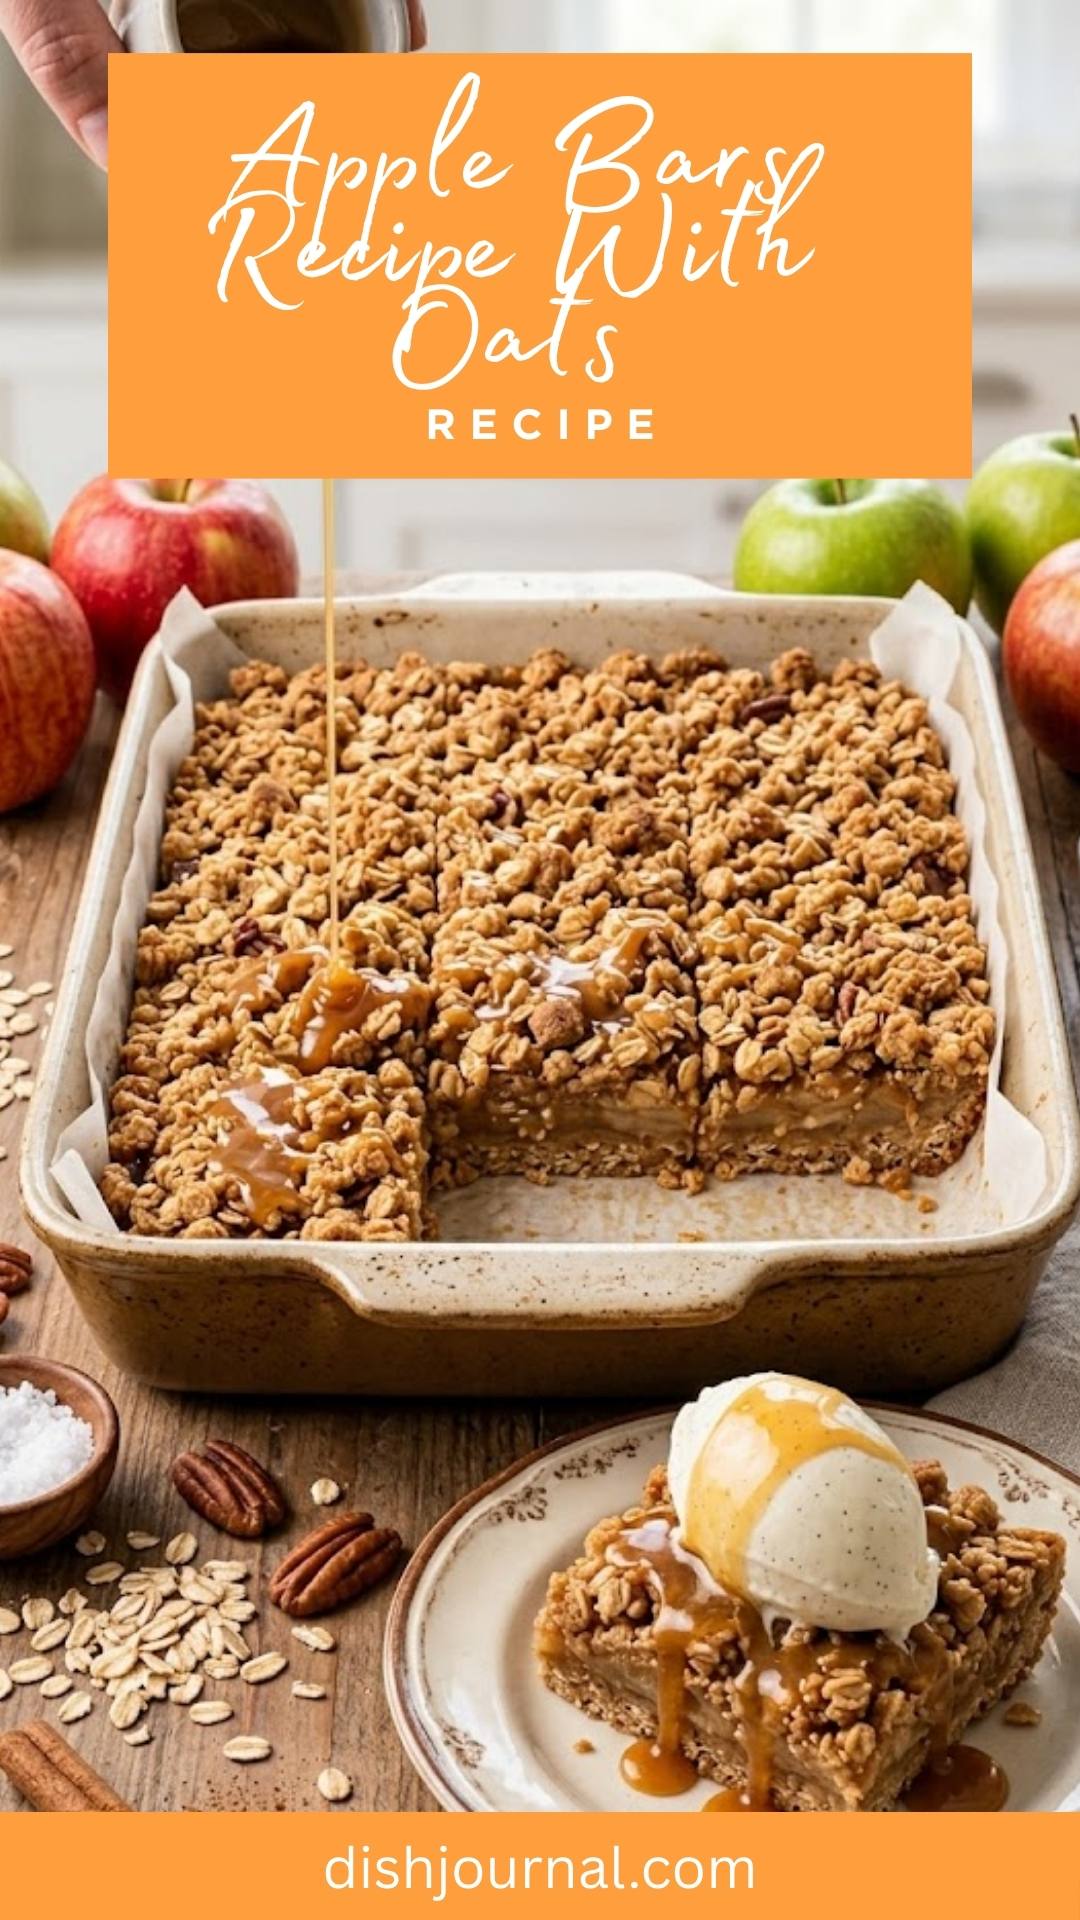
They remind me of cozy holidays with family, laughter, and the irresistible warmth of homemade goodness. These apple bars with oats complement a scoop of vanilla ice cream or a steaming cup of coffee perfectly. Trust me; it’s the kind of dessert that’ll make you feel right at home.

Apple bars are a wonderful blend of chewy oats and sweet apple goodness, and they are incredibly easy to prepare. This recipe transforms the classic apple pie experience into a convenient bar format, perfect for sharing at gatherings or savoring during a quiet evening at home.
With the perfect balance between soft, sweet apples and a crumbly, buttery oat topping, these treats will satisfy your sweet tooth without feeling guilty.
You Might Like These Recipes!
How I have used the ingredients in this recipe?
Let’s talk about the ingredients I’m using for this delightful apple bar recipe. The star is, of course, the apples—cooked down into a flavor-packed filling that brings warmth and sweetness. Combined with oats, flour, and a touch of brown sugar, the crust is rich yet wholesome. I’ve also added a hint of nutmeg, giving it that extra depth of flavor without overshadowing the apple goodness itself. And let’s not forget the butter—because a little fat brings out the richness in everything!
The Ingredients

Here’s what you’ll need for these scrumptious apple bars:
– Apple Pie Filling
– 2 cups apples (cored, peeled, and chopped)
– 2 tablespoons unsalted butter
– ¼ cup packed light brown sugar
– 1 teaspoon ground cinnamon
– ¼ teaspoon freshly grated nutmeg (to elevate flavor)
– 2 tablespoons all-purpose flour
– 2 tablespoons water
– ¼ teaspoon salt
– Oatmeal Bars
– 1 ½ cups all-purpose flour
– 1 ½ cups rolled oats
– 1 cup packed brown sugar
– 1 teaspoon baking powder
– ½ teaspoon salt
– 14 tablespoons unsalted butter (cut into pieces)
– A dash of vanilla extract (for sweetness)
Ingredients From : realhousemoms.com
How to make apple bars recipe with oats?
Creating these scrumptious apple bars is simple and quick. Let’s dive into the step-by-step process that’ll have your kitchen smelling like a cozy bakery!
Step 1: Prepare the Apple Filling

In a medium saucepan, combine the chopped apples, butter, brown sugar, flour, ground cinnamon, freshly grated nutmeg, water, and salt. Put the saucepan over medium heat and stir all the ingredients together. You’ll want to allow this mixture to cook for about ten minutes, or until the apples soften and the sauce thickens. Once done, remove it from heat and let it cool as you tackle the next steps.
Step 2: Preheat Your Oven

Set your oven to preheat at 350 degrees Fahrenheit. This is crucial since you want those apple bars to bake evenly. While the oven warms, grab your baking dish!
Step 3: Prepare the Baking Dish

Grease a 9×13 inch baking dish with a non-stick cooking spray or butter to ensure your apple bars slide right out after baking. You don’t want your hard work sticking to the pan, do you?
Step 4: Make the Oat Mixture

In a large mixing bowl, whisk together the all-purpose flour, rolled oats, packed brown sugar, baking powder, and salt. This combination will create the delightful base and topping for your bars.
Step 5: Combine with Butter

Using a fork or pastry cutter, add in the pieces of butter into the oat mixture. Work it in until you achieve a crumbly texture that sticks together when pinched between your fingers. Think of it as a mini workout for your arms!
Step 6: Press the Base into the Dish

Take half of your oat mixture and press it evenly into the bottom of the prepared baking dish. Make sure to pack it down firmly for a sturdy base.
Step 7: Spread Apple Filling
Next, pour the cooled apple pie filling over your oat base. Spread it out evenly. This will create a beautiful layer of sweet, gooey goodness that will melt in your mouth.
Step 8: Add the Crumbly Oat Topping
Now, sprinkle the remaining oat mixture evenly on top of the apple filling. You want an even layer here to give each bite a perfect balance of sweet apples and crumbly oats.
Step 9: Bake to Perfection
Pop the baking dish into the preheated oven and let it bake for 30 to 40 minutes. You’ll know it’s done when the top is golden brown and smells irresistible—like a warm hug on a plate.
Step 10: Cool and Serve
Once the bars are baked to perfection, remove the dish from the oven and let it cool completely on a wire rack. If you can wait that long, slice it into 12 squares and serve. Any leftovers? Store them in an airtight container and enjoy later on!
Recipe Notes
– Feel free to mix and match spices: If you love spices, a touch of allspice or ginger can really elevate the flavor!
– Apple choices matter: For a firmer bite, go with Granny Smith apples. For sweetness, Honeycrisp works beautifully.
– Buttering is key: Don’t skimp on butter—it’s essential for that lovely rich texture.
– Cut when cool: Waiting for the bars to cool completely aids in cleaner cuts.
– Make ahead: These apple bars can be prepared a day in advance. They taste even better after the flavors meld overnight.
Storage Tips
To store your delicious apple bars, let them cool completely and then place them in an airtight container. They can be kept in the fridge for up to a week. If you’d like to keep them longer, you can freeze them. Just cut into squares, wrap individually in plastic wrap, and place them in a freezer-safe container. They can last for about 2-3 months in the freezer.
Serving Suggestions
Here are a few ways to enjoy these tasty apple bars:
– With Ice Cream: Top each bar with a scoop of vanilla ice cream for an indulgent dessert that will impress everyone.
– Coffee Companion: Pair your apple bars with a cup of strong coffee for a delightful afternoon treat.
– With Whipped Cream: Dollop some whipped cream on top to add a fluffy richness that complements the bars.
– Warm From the Oven: Serve them warm right after baking for that fresh-baked comfort experience.
– With a Drizzle of Caramel: A drizzle of caramel sauce over the bars makes them even sweeter and a real showstopper!
What other substitutes can I use in apple bars recipe with oats?
If you’re looking to switch things up, here are some substitute ideas:
– Gluten-Free Flour: Use a gluten-free all-purpose flour if you need a gluten-free version without sacrificing taste.
– Maple Syrup: Swap brown sugar with maple syrup for a unique depth of flavor and a touch of natural sweetness.
– Coconut Oil: Replace butter with coconut oil for a slightly different taste and a dairy-free option.
– Honey or Agave Nectar: Use honey or agave syrup instead of brown sugar for a natural sweetener that brings its own distinct flavor.
– Other Fruits: Feel free to combine apples with other fruits like pears or berries for a varied flavor profile in your filling.
Apple Bars Recipe With Oats
Ingredients
Equipment
Method
- In a medium saucepan, combine the chopped apples, butter, brown sugar, flour, ground cinnamon, freshly grated nutmeg, water, and salt. Put the saucepan over medium heat and stir all the ingredients together. You’ll want to allow this mixture to cook for about ten minutes, or until the apples soften and the sauce thickens. Once done, remove it from heat and let it cool as you tackle the next steps.
- Set your oven to preheat at 350 degrees Fahrenheit. This is crucial since you want those apple bars to bake evenly. While the oven warms, grab your baking dish!
- Grease a 9×13 inch baking dish with a non-stick cooking spray or butter to ensure your apple bars slide right out after baking. You don’t want your hard work sticking to the pan, do you?
- In a large mixing bowl, whisk together the all-purpose flour, rolled oats, packed brown sugar, baking powder, and salt. This combination will create the delightful base and topping for your bars.
- Using a fork or pastry cutter, add in the pieces of butter into the oat mixture. Work it in until you achieve a crumbly texture that sticks together when pinched between your fingers. Think of it as a mini workout for your arms!
- Take half of your oat mixture and press it evenly into the bottom of the prepared baking dish. Make sure to pack it down firmly for a sturdy base.
- Next, pour the cooled apple pie filling over your oat base. Spread it out evenly. This will create a beautiful layer of sweet, gooey goodness that will melt in your mouth.
- Now, sprinkle the remaining oat mixture evenly on top of the apple filling. You want an even layer here to give each bite a perfect balance of sweet apples and crumbly oats.
- Pop the baking dish into the preheated oven and let it bake for 30 to 40 minutes. You’ll know it’s done when the top is golden brown and smells irresistible—like a warm hug on a plate.
- Once the bars are baked to perfection, remove the dish from the oven and let it cool completely on a wire rack. If you can wait that long, slice it into 12 squares and serve. Any leftovers? Store them in an airtight container and enjoy later on!
Nutrition
Notes
Tried this recipe?
Let us know how it was!FAQs
1. Can I use canned apple pie filling in this recipe?
Absolutely! Canned apple pie filling can save you time, although making the filling from scratch gives you more control over sweetness and spices.
2. Is it necessary to use rolled oats?
While rolled oats work best for texture, quick oats can be used. However, the bars may have a different texture and won’t be as hearty.
3. What can I do if my apple bars are too crumbly?
Ensure that enough butter is used to bind the oat mixture together. Next time, try slightly less flour if it continues to crumble.
4. Can I add nuts to the recipe?
Absolutely! Chopped walnuts or pecans would add a delicious crunch and flavor enhancement.
5. How long do these apple bars last?
Stored in an airtight container, these bars can last up to a week in the refrigerator. They freeze well, too, for up to 2-3 months.
Conclusion
Creating these apple bars with oats is both a fun and rewarding cooking adventure. They offer a comforting treat for any occasion and are surprisingly simple to make. With a delightful blend of textures and flavors, they’re bound to become a household favorite around your dinner table—or wherever you enjoy your sweet treats.
So roll up your sleeves, gather your ingredients, and treat yourself and your loved ones to a batch of these delicious, wholesome delights! Enjoy the baking journey and happy snacking!